Wednesday, 30 April 2014
DAY 16
Today I continued my top down zombie shooter game with THIS video. By following along that video, I added a background and sort of a scene. I made it so that there is a sort of mist flowing through the world infinitely, and also made it so the camera follows along with the movements of the player within the game. I added another object acting as the zombies, and made it follow the player constantly. Then I pasted in some code that actually added a particle of a blood splat. Then I centered it onto the zombie whenever the object bullet hits it, and it takes about 2 hits for it to dissappear or die. I coded it so the bullet doesn't just go in one direction the whole time, and made it so it shoots randomly. Then I made the gun a shotgun by adding two other bullets. Finally, I am starting to make 3D trees within the environment. I made it 36.13 mins through the video today.
Tuesday, 29 April 2014
DAY 15
Today I finished off with the sort of test game with the video I was following along. Unfortunately the video was only ten minutes long, and it only showed me how to do the really simple parts of a top-down-shooter. Anyway, the things I finished off were the W,A,S,D controls of the character that go along with the mouse rotation. I also created a zombie character to act as an enemy. I made it so that when the bullet object hits the zombie sprite, it dissappears. Then I made it so that it takes a few bullets to do so. That was when the video ended off. So I then decided to either improve upon my game, or create a whole different, and better game. It was at that point when I found a video that showed a more difficulty way to create a zombie shooter. This video is one hour long but I am willing to go along with it. At this point I am 11.49 mins through. HERE is the video.
Monday, 28 April 2014
DAY 14
Today I followed along this video HERE, and began creating a top-down-shooter type game. It started by creating the sprites, and connected them to their objects. I downloaded the background (floor) from google images, and same with the character. With the bullet I just painted from within the program, because it is a very small object and it's not very visible. I then started adding a bunch of code to the object character. Basic rotations with the character, and also making it so the character can actually shoot. I made it so that the character rotates following the mouse movements, and shoots with the click of the mouse.
Friday, 25 April 2014
DAY 13
Today I went to go and try to finish the first level of my platformer game, and it all of a sudden deleted the whole entire game and everything I did. I tried to recover it, but there was no other way. So I decided to move on and just create a (simpler) different genre of games called a top-down shooter. This seems alot easier because I don't have to make any mechanics for gravity or anything. I can just focus on the actual game. I started by painting pixel by pixel, a main character for the game. I followed along this video HERE
Wednesday, 23 April 2014
DAY 12
Today I tried to kind of add some things to the platformer without using any videos or anything, because I thought that it would be alot easier, though it was quite hard to do without any guidance so I watched some different videos on it. Basically, I didn't end up actually adding anything to it today, just learning things from videos.
Tuesday, 22 April 2014
DAY 11
Today I was following the video I've been watching for the past few days, and created some mechanics to the gravity, such as rotation and such when the character or sprite is jumping in the air. Also I made it so that the ground acts as an actual ground instead of a picture that has no use. After I finished all of that, my Game Maker Studio decided to stop responding and crashed, deleting all of the things I previously made this whole day (this is why I should have saved more often).

Thursday, 17 April 2014
Wednesday, 16 April 2014
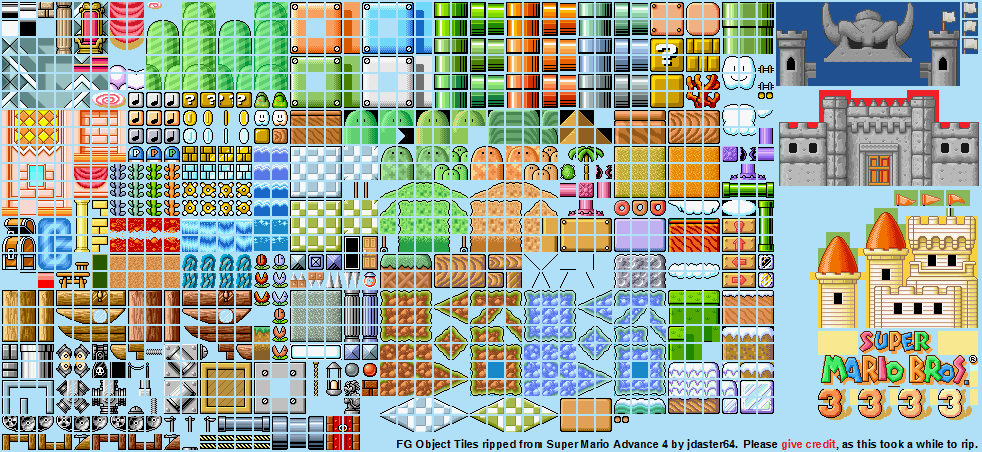
DAY 9
Today I downloaded some mario tile art for the graphics of my game which can be found HERE. I started to figure out how to use a photo with multiple tiles on it, and use only one tile in that photo. To do that I just imported that photo to game maker and created a background. I then loaded it into game maker and set the tile properties to: tile width: 16, height: 16, horizontal offset: 2, vertical offset: 2, horizontal sep: 2, and vertical sep: 2. Then I selected a tile I wanted to use and held down shift and drew the ground. Below is a photo of the game so far, besides the mechanics and controls behind it.

Tuesday, 15 April 2014
DAY 8
Today I created a very simple maze type of game, and I have all of the basics of Game Maker down. So I started making a platformer game and followed along this video HERE. It shows how to make a simple platformer which is exactly what I am looking to do. All I have to do to make the movements of the character, is add an event to the object connected to the character (which I figured out how to do), then click keyboard, then click the arrow direction, and add a speed to it. In order to do this, I had to create a sprite and connect it to an object.
Monday, 14 April 2014
DAY 7
Today I found another youtube tutorial on making a flappy bird type game, and it definitely wasn't as helpful as the last video because it didn't have anyone talking or anything. Though the last video was also a bit confusing because it showed to add an action to the sprite of the bird, but when I went to add it, there was no button to add an action. I think I might just start off doing a simpler type of game such as a pixel platformer or something like that. Here is the link to that video: CLICK HERE
Thursday, 10 April 2014
DAY 6
Today I was searching up a few different video tutorials on Game Maker Studio, and came across a video on how to make a flappy bird type of game. I decided that this will probably be the easiest type of game to do, and It would be kind of cool since the original flappy bird got so much success. Here is the link to that video I was watching: CLICK HERE

Wednesday, 9 April 2014
DAY 5
Well today I watched a few different tutorial videos to get a different perspective on it and learned that it is alot easier to sort the objects, backgrounds, etc. with names to not get anything mixed up. I also added minor details to the game.
Tuesday, 8 April 2014
DAY 4
Today I continued watching and following along the Game Maker Studio tutorial video. There is not much more to say other than that.
Monday, 7 April 2014
DAY 3
Today I continued watching the tutorial video for Game Maker Studio. I started to follow along with the video and create a simple platformer. I've only got the basics down such as the background, and the first room (level). I hope to spend quite some time on this game and make it look quite good.
Friday, 4 April 2014
DAY 2
Today I started watching youtube videos on beginning tutorials for Game Maker Studio. I am planning to maybe start on making a platformer game to start out with because i'm thinking that it will probably be the easiest to make. There was one video in particular that was quite helpful and taught me the four main things to create a game: Rooms, Backgrounds, Sprites, and Objects. The link to that video is HERE.
Thursday, 3 April 2014
MONTH 3: DAY 1
Today and yesterday the whole both classes I spent trying to upload the high resolution video to youtube, but it got to about 70% done before the class ended. I don't know how I will be able to actually upload it so I will most likely just transfer it using a USB. The next thing I decided to do Is Game Maker Studio, which I was going to do from the start originally.
Subscribe to:
Comments (Atom)